Storing Dry Pantry Staples: Jars, Original Packaging, and Airtight Bins Compared
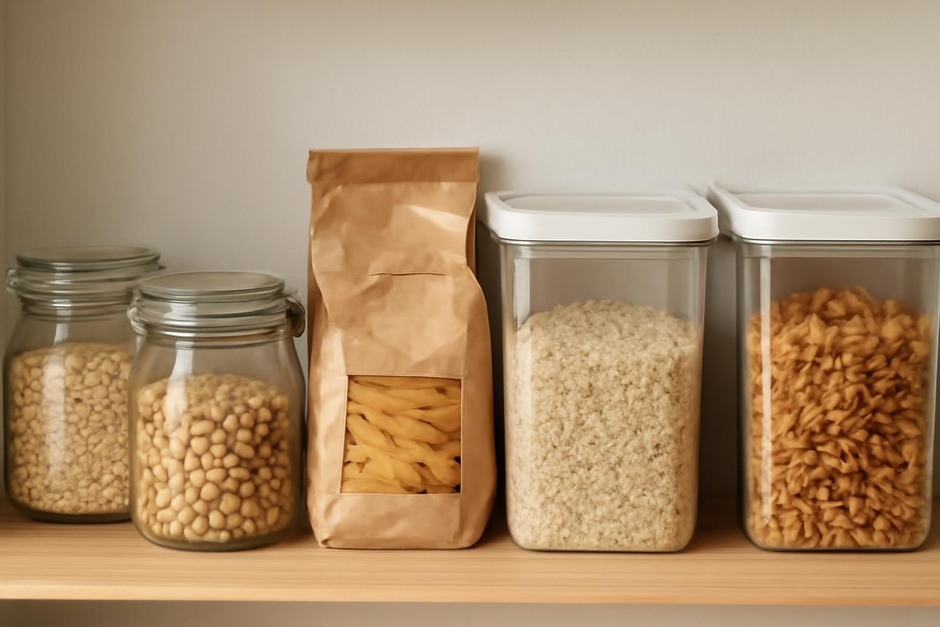
Keeping dry staples like flour, rice, pasta, sugar, and oats in good condition is mostly about preventing moisture, pests, and stale flavors while making the items easy to use. Three common approaches—glass jars, original packaging, and airtight bins—each have practical trade-offs. Below is a clear comparison to help beginners pick the right method, followed by a short, repeatable routine to maintain the pantry.
Approach 1: Glass Jars
Glass jars (mason jars or recycled jars) are popular for their visibility and aesthetic. They are a go-to in many kitchens for frequently used dry goods.
Pros
- Visibility: You can see contents and remaining quantity at a glance.
- Nonreactive: Glass won’t absorb flavors or oils and is easy to clean.
- Moderate protection: Good barrier against air and pests when sealed well.
- Reusable and recyclable: Environmentally friendlier than single-use plastic.
Cons
- Breakable: Glass can chip or shatter if dropped.
- Limited stackability: Jars take more shelf space than flat packaging or stackable bins.
- Seals vary: Not all lids are truly airtight over the long term.
Approach 2: Original Packaging
Keeping items in their original bags or boxes is the simplest and often the cheapest option. Many staples come in paper or plastic packaging designed for short-term shelf life.
Pros
- Low cost and low effort: No transfer required when you shop.
- Space efficient: Bags and boxes can fit more tightly on shelves.
- Labeling included: Best-by dates and product information are already printed.
Cons
- Weaker pest and moisture protection: Paper bags are vulnerable; unsealed plastics let air in.
- Harder to scoop from: Bags can be awkward when you need to measure or pour.
- Shorter visible lifespan: It’s harder to see at a glance how much is left unless packaging is clear.
Approach 3: Airtight Bins (Plastic or Metal)
Airtight bins or canisters made for pantry use provide strong protection and often stack neatly. They come in a range of sizes and shapes.
Pros
- Excellent barrier: Properly sealed bins keep moisture and pantry pests out.
- Convenient dispensing: Many have wide openings or spouts for scooping and pouring.
- Stackable and space-smart: Square or rectangular bins make efficient use of shelf space.
Cons
- Cost: Good airtight containers can be more expensive than jars or keeping original packaging.
- Material concerns: Some plastics may retain odors; choose food-grade materials.
- Less transparent options: Opaque bins hide contents unless labeled or using clear windows.
How to Choose Between Them
Match the storage approach to what you buy, how you cook, and the space you have. Consider these factors:
- Frequency of use: For daily items like sugar, coffee, or oats, prioritize accessibility—glass jars or easy-dispense bins work well.
- Shelf space and layout: If space is tight, square airtight bins stack better than round jars.
- Pest risk and humidity: In humid climates or where pantry pests are common, choose airtight containers over paper or loosely sealed packaging.
- Budget and sustainability: Reused glass jars and keeping items in original packaging are cheaper; durable airtight bins are a longer-term investment.
- Visibility and labeling: If you like to see what you have, clear glass or transparent bins are best; otherwise label opaque containers clearly.
Quick decision guide: If you want low cost and minimal change, keep original packaging for long-term storage and transfer frequently used items into jars or small airtight bins. If pest control and humidity protection are priorities, use airtight bins for bulk staples and jars for portioned items.
A Short, Repeatable Pantry Routine (5–10 minutes, Weekly)
- Quick visual check (2 minutes): Scan shelves for obvious spills, crumbs, or damaged packaging.
- Rotate near-expiry items (1 minute): Move older packages toward the front so they get used first.
- Top up or transfer (2 minutes): Refill jars or bins from new bags if needed, wiping lids and rims as you go.
- Spot clean (1–2 minutes): Wipe small spills with a damp cloth; sweep crumbs into the sink or trash.
- Note restocks (optional, 1 minute): Jot down staples that are low to avoid overbuying next time.
Once a month, plan a slightly longer session to empty a shelf, vacuum or wipe it clean, check for stale odors or pests, and wash containers that touch food. Small, regular maintenance keeps any storage system working well.
Choosing the right storage method and sticking to a short weekly routine will make your pantry easier to use and keep staples fresher longer. Pick the combination that fits how you cook and the space you have, and the rest becomes simple habit.