Preserving Summer Berries at Home: Freezing, Jam, and Oven-Drying Compared
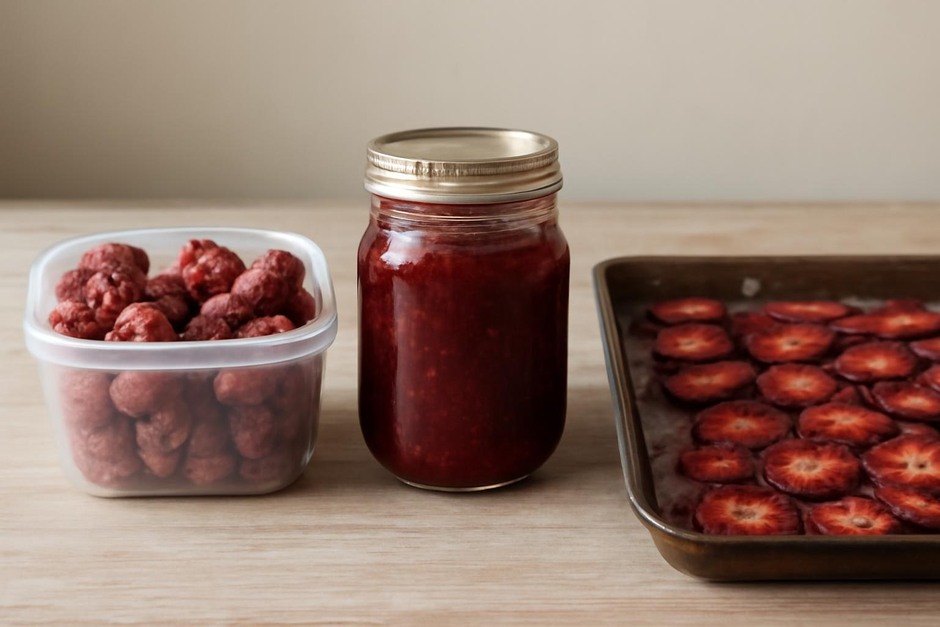
When berries come at peak season, the question shifts from « how to eat them now » to « how to keep their flavor for later. » Three simple, reliable approaches—freezing, making jam, and low-temperature oven-drying—use different principles to extend shelf life and create distinct textures and uses. Below is a comparison of how each method works, a small practical example you can try with a pint of berries, and guidance for choosing the best approach for your kitchen habits.
Approach 1: Freezing — Preserve Fresh Texture and Flexibility
Principle
Freezing halts enzymatic activity and microbial growth by lowering temperature. The berry’s water turns to ice, preserving most of the raw flavor and nutrients. Freezing works best when you want berries later for smoothies, baking, or thawed eating.
Small example
- Rinse and gently dry 1 pint (about 2 cups) of raspberries or blackberries.
- Spread berries on a baking sheet in a single layer and freeze until solid, about 2–4 hours.
- Transfer frozen berries to an airtight container or freezer bag, removing excess air. Label with the date.
Tip: Flash-freezing keeps individual berries separate, which makes it easy to grab small portions without thawing the whole batch.
Pros and cons
- Pros: Very little hands-on time, preserves fresh flavor well, versatile for many uses.
- Cons: Texture is softer after thawing; requires freezer space and reliable cold storage.
Approach 2: Small-Batch Jam — Concentrated Flavor and Spreadability
Principle
Jam combines fruit, sugar, and often pectin, then cooks the mixture to reduce water content and create a gel. Sugar acts as a preservative by lowering water activity, and the cooked, sealed environment reduces spoilage. Jam is ideal when you want a spoonable, long-lasting product for toast, yogurt, or baking.
Small example
- Combine 2 cups of strawberries (chopped) with 1 cup of sugar in a small saucepan.
- Heat gently until sugar dissolves, then simmer for 10–15 minutes, stirring, until the mixture thickens. A chilled plate test helps check set: a drop on a cold plate should wrinkle when nudged.
- Ladle into a clean jar and cool; store in the refrigerator for short-term use or process in a water bath for longer shelf life.
Pros and cons
- Pros: Intense, shelf-stable flavor; spreadable texture; good for gifting and pantry storage.
- Cons: Requires sugar (adjustable but functional), more active cooking time, and attention to cleanliness if you seek long-term storage without refrigeration.
Approach 3: Oven-Drying — Concentrated Chewy Fruit with Long Shelf Life
Principle
Drying removes water so microbes cannot grow, concentrating sugars and flavor. Low, slow heat in an oven converts fresh berries into chewy or leathery pieces that keep well in airtight containers. Dried berries are great for snacking, cereal, or rehydrating in recipes.
Small example
- Preheat the oven to its lowest setting, typically 120–140°C (about 250–285°F) on some ovens; if yours runs hot, use a lower temperature and prop the door slightly open to reduce heat.
- Slice strawberries thinly or halve small berries. Arrange on a lined baking sheet without overlapping.
- Bake until the pieces are dry and pliable, 2–4 hours depending on thickness, rotating the tray if needed. Cool and store in an airtight jar.
Pros and cons
- Pros: Lightweight, shelf-stable, and highly portable; flavor concentrated and useful in many recipes.
- Cons: Oven time and energy use can be significant; texture is permanently altered and not suitable for uses that need fresh berries.
How to Choose Between These Methods
Deciding among freezing, jam, and drying depends on three practical considerations: intended use, available storage, and how much time you want to invest.
- Intended use: If you want to keep berries for smoothies, compotes, or baking where the fresh flavor and moisture matter, freezing is often best. For spreads, desserts that need body, or pantry gifts, jam suits well. If you want snacks, trail-friendly fruit, or an ingredient that stores at room temperature, choose drying.
- Storage constraints: Freezing requires freezer space and steady power. Jam needs clean jars and either refrigeration or proper canning to shelf-stable store. Dried fruit stores compactly at room temperature in sealed containers.
- Time and attention: Freezing is low-effort but needs freezer trays and bags. Jam takes active cooking time and attention to cleanliness for longer storage. Drying runs long in the oven but needs little hands-on time after setup.
Match a method to a scenario: if you harvest a large bowl and plan to bake over winter, flash-freeze in portions. If you want jars for breakfasts and small gifts, make small-batch jam. If you enjoy portable snacks or want shelf-stable additions to granola, oven-dry a tray.
Each method preserves a different aspect of the summer berry experience—freshness, spreadable sweetness, or concentrated chewiness. Trying a small batch of each will quickly reveal which textures and flavors suit your kitchen routines and recipes best.